
After moving into our new house in the country, I realized that I needed a riding mower to be able to cut my grass in a reasonable amount of time and a way of clearing my 100 ft long driveway. After visiting a few local tractor dealers, I bought a Cub Cadet 782 on December 29, 2001 that was equipped with a tiller, 60C mower, and H42 snow blower. I also got tire chains and wheels for the winter.
I have a large property and it usually takes me about 3-hours to mow it with tractor and its 52" deck. I also use the tractor for towing trailers and this photo is of me while I was planting 239 trees provided to me by the Niagara Restoration Council on November 24, 2013.

The tractor's Kohler KT17 engine was an oil burner and we had to make sure to top off the crankcase whenever the gas tank was refilled. In July of 2006, we negligent in checking the oil level and, after a short time into the lawn cutting on that fateful day, there was a loud bang. The tractor began running rough and was way down on power. Upon further investigation, it turned out that one of the connecting rods broke.
Having checked out my options including Fordlord's conversion, I decided my best course of action was to repower my tractor with the Honda GX610-TXF2 kit (no longer offered) from the Small Engine Warehouse. One nice feature of the the Honda GX610 is that it is equipped with a low oil level shutdown. The Honda is rated for 18 hp compared with 17 hp for the Kohler.
This article is based on the forum topic I started on Jul 31, 2006: Farmall Cub - Repowering a Cub Cadet 782 with a Honda Engine
My Cub Cadet 782 with the Kohler KT17 showing the removed cylinder head.

The kit as it was shipped from the Small Engine Warehouse. SEW doesn't ship to Canada so I had to ship it to a friend's house in Buffalo. Luckily for me, he only lives about 20 minutes from my house.
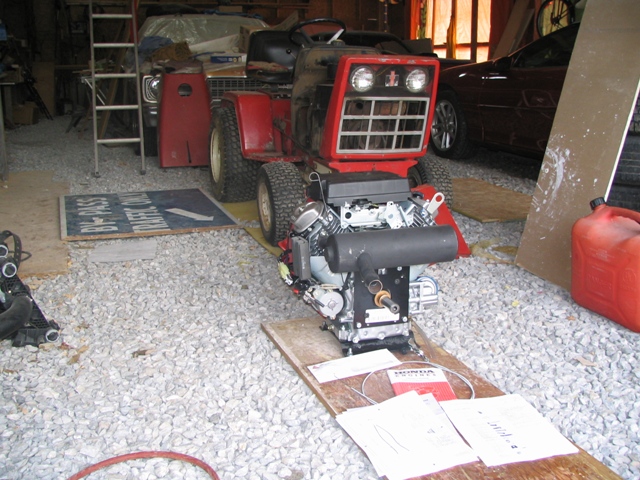
The engine just prior to removal. At this point, the driveshaft, fuel line, and cables were disconnected. It took me a little while to figure out that there was no need to remove all of the sheet-metal shrouding from the engine. I found that after removing the front grill and removing all 6 bolts from the engine support plate under the tractor, the engine could be lifted out quite easily.
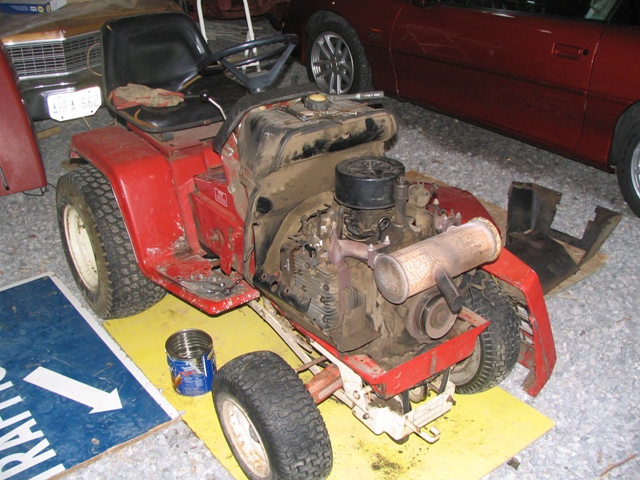
A Cub Cadet with no engine. Anyone need a spare Kohler KT8½? Doesn't run half bad!

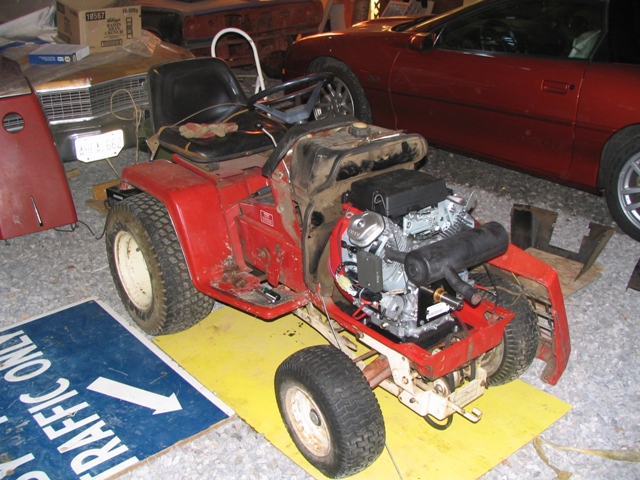
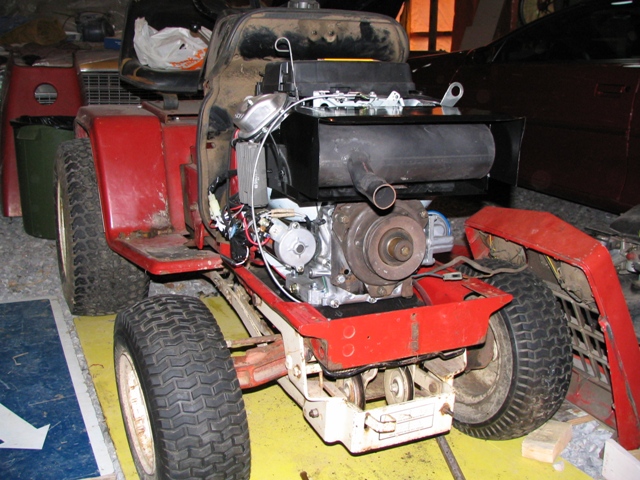
A Cub Cadet with a new Honda engine. The wiring harness was slightly damaged in shipping so I soldered in a new splice to make sure I have a good connection. I also found that the new throttle cable did not have threaded mounting holes so I had to thread them with a #10-24 tap. My fuel line was a bit too short (and showing its age) so I replaced it.
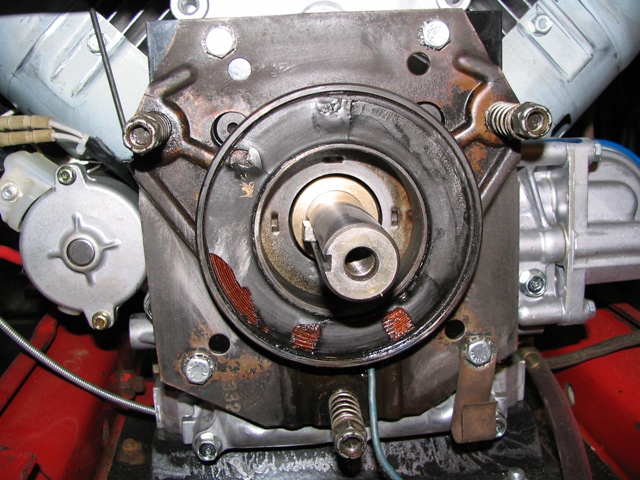
At this point, I have to figure out how to remove the electric PTO from the front of the old engine. The PTO's innermost sleeve seems to be seized onto the engine's output shaft. I sprayed it with penetrating oil and tried to work it off but it just wouldn't budge. The advice from the Cub Cadet forum was to use wedges and that was a great idea.My local tractor mechanic also suggested to screw the bolt back into the driveshaft's snout and tap it with a hammer to help it out.
Using a brass rod as I tapped on the bolt, the PTO clutch slowly worked itself off from the shaft with some help from the wedges. I put some Never-Seize on the new shaft so I won't have this problem next time.

I wasn't sure of the positions of the brass spacers since there didn't seem to be a need to have the flat ring behind the clutch. However, the clutch seemed to be too tight and I couldn't turn the driveshaft by hand anymore.

The assembly instructions indicate the ring goes at the bottom of the output shaft underneath the clutch and the cylindrical spacer goes between the clutch and the bolt. The clutch also binds in this arrangement.
After backing off the 4 bolts holding the clutch to the adapter plate and loosening up the snout bolt, there is about an 1/8" gap between the clutch and the adapter plate as indicated by the screwdriver in the bottom of the photo.

There is also a 1/8" to 1/4" gap between the end of the shaft spacer and the bolt.
To take up the extra clearances, I tried adding a lock washer and flat washer under the clutch and a 3 flat washers between the cylindrical spacer and the bolt. This seemed to work fairly well to eliminate any binding in the clutch. Even though the bolt is on tight, there is just enough clearance for the cylindrical spacer to spin freely.
The clutch seemed to work fine with the old engine but seemed to either slip or bind on the new engine. As installed with the additional washers, the clutch seemed to chatter and smoke when engaged. The kit includes an 0.017" feeler gauge for adjusting the clutch. However, it seems to be to tight when adjusted for that gap.
I then backed off the clutch adjustment nuts and, with the engine running, retightened everything until the clutch just made contact. I then backed off the nuts until the clutch started to spin freely. When I engaged the PTO, I noticed some smoking from the clutch.

The problem that I was encountering was that the spacer ring was too large of a diameter to clear the hole in the clutch's backing plate. As you can see, I had some interference. The ring on the left was the smaller one that SEW sent to me at no extra charge.
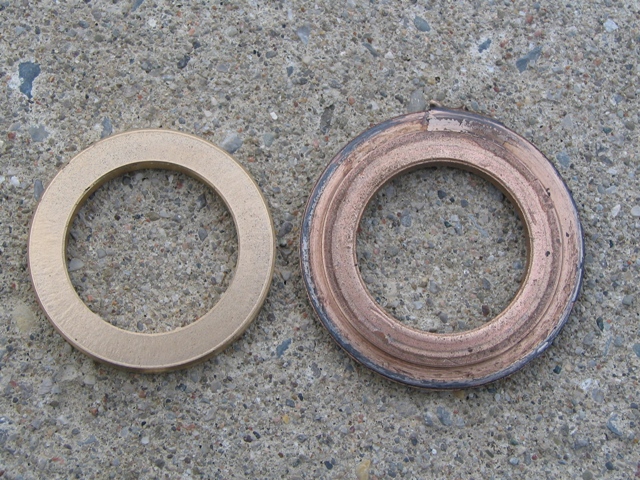
Even with the smaller spacer ring, there was some interference and I had to file the hole in the clutch's backing plate about 1/8" larger diameter to be safe.
I think the problem was due to a variation in the design of the PTO clutch. The hole in my clutch's backing plate was 1-5/8" and SEW obviously based their design on one with a much larger hole.
SEW was quick to send me a replacement which was also 1-5/8". However, because the two diameters were the same, the hole center did not match exactly with the shaft center and, although the pieces now fit together, I found there was still some interference. With a pencil, I circumscribed a circle around the spacer ring which then gave me an indication of how much material to file away.

Fordlords commented that "the cracking and flaking of the plastic coil coating is common on those old Warner PTO clutches. You can preserve their life by covering the outside of the coil surround with several thin coats of silicone RTV gasket maker. The wire windings themselves are covered with an insulation coating too, so a few cracks of that hard plastic is really no reason for panic- believe me when I say it, even a well worn old Warner PTO clutch is a lot tougher then the ones they are putting in new tractors today."
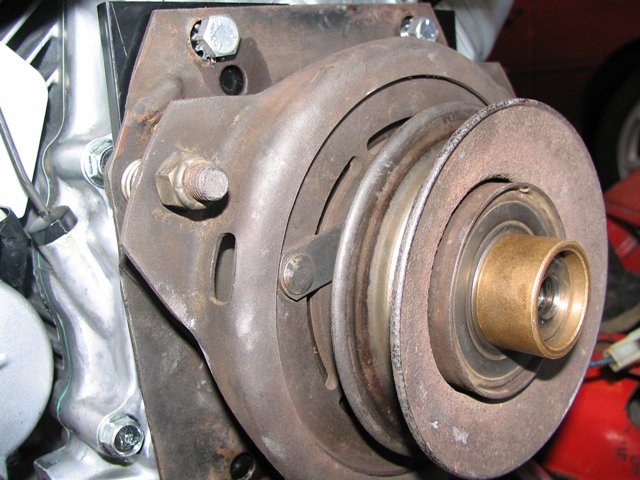
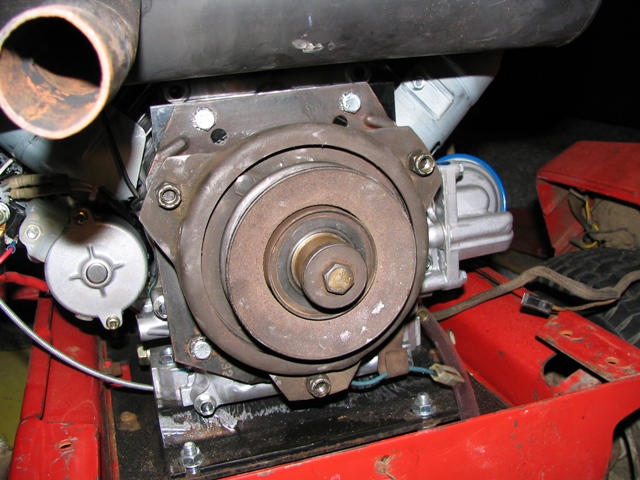
After the backing plate had enough clearance and was torqued down, the flywheel is the next item to be installed.
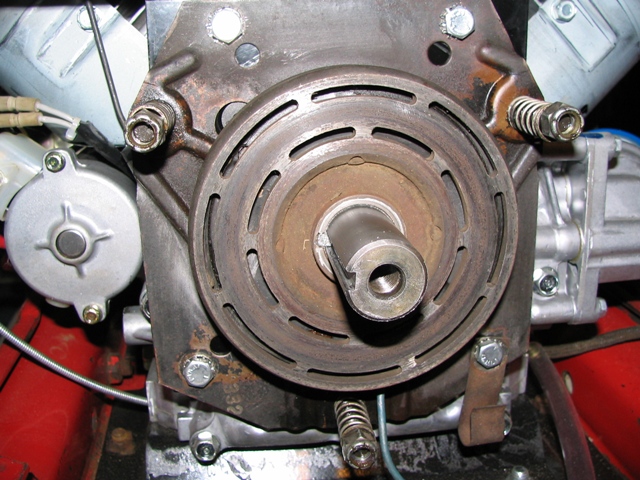
The sleeve goes on next.

And now the pulley.
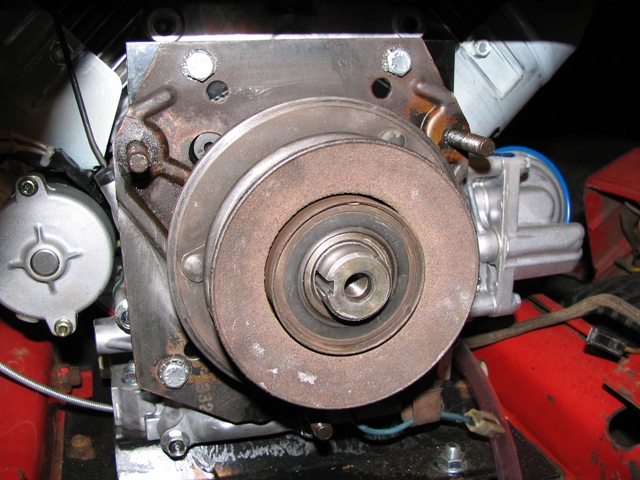
The last items are the clutch cover and the bolt. Because the output shaft of the Honda engine is longer than the Kohler's, you need to put the sleeve spacer between the pulley and the bolt. The sleeve space is longer than required but everything works properly once the bolt is tightened. There are three holes in the side of the clutch cover near each of the cover hold-down studs. You use the 0.017" feeler gauge to set the clearance between the cover and the flywheel.
Once I got everything together, my new Honda engine started easily and ran well out of the box.
A view of my driveshaft as it is attached to the adapter. Not having had experience with engine alignment, I decided to let the engine find it's own mounting position. After leveling the frame, I let the engine run at various speeds with loose mounting bolts. After a few pushes in various directions, the engine always wanted to return to one position so I tightened it down in that location.

After having reinstalled the hood and side panels, I got to thinking that I should have centered the engine on the frame rather than just letting it find its own home and then tightening it down. The engine's torque at full throttle caused the engine to wander to the extreme right hand side of the frame.
Not liking the non-centered engine position, I took everything apart again and loosened the engine hold-down bolts. This time I just left the engine run at a much lower speed and the vibration moved it into a position that was more centered. The exhaust pipe was not centered in the grill opening so I had to heat the exhaust pipe again to recenter it in the grille before reassembled the hood and side panels.
I believe that the Honda is a bit shorter than the KT17 even though the crank snout is a bit longer. The PTO pulley on the Honda should end up in approximately the same location as the Koehler and the mule drive pulleys appear to be properly aligned.
After running the engine with this alignment, I learned that I need to do a better job with engine alignment. In 2013, my front rag joint started to disintegrate along with major wear on my front universal joint. See Driveshaft Alignment for more information.
I checked the butt splice that SEW provided on the end of the new starter cable and noticed that it was loose. To be safe, I stripped off the insulation, crimped the old starter wire into the splice, and soldered everything together.
Upon trying to start the engine, I noticed that it would not turn over. This is because my tractor has a starter solenoid beside the battery and the new engine has a starter solenoid on the starter motor. I figured the simplest way to power up the Honda solenoid was to make a short jumper to connect the large terminal with the solenoid's spade terminal. I had no problems starting the engine with the jumper in place.

After a few attempts at figuring out how to run the throttle cable, this arrangement seems to be the simplest and best. Since I have an throttle cable hole on the right side of the firewall, SEW could have supplied me with a cable about 1-ft shorter but I didn't want to learn how to properly shorten a throttle cable today. I ran the cable to the left side of the engine, under the center of the engine mounting plate and up to the throttle bracket.

I painted the muffler's heat shield black because I thought the bare sheet-metal look didn't look finished to me. I also thought it would be a closer match to the Kohler's black ducting.
The muffler from a side view.
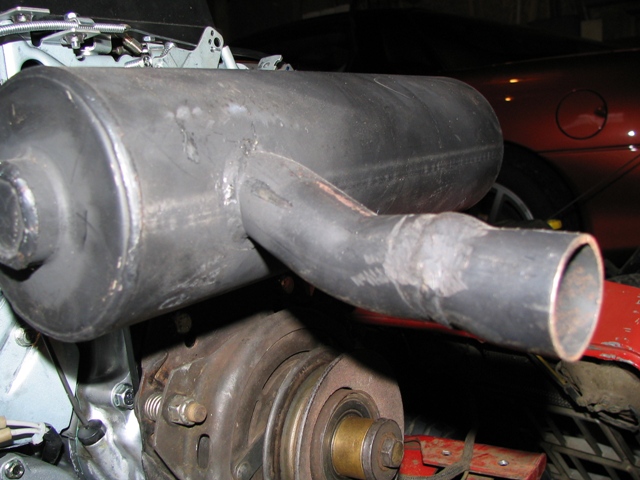
For some reason, the engine wanted to run to the right side of the tractor so I tightened it down there. This caused the outlet to interfere with the grille. The exhaust pipe was also too low so I had to put some heat on it to move it up and to the right so it was centered in an opening. Notice that the original muffler had worn the grille slightly on the other side of the hole.

The recommendations from my Honda owners manual:
- above 50°F / 10°C - SAE 30
- above 0°F / -15°C - SAE 10W30
- below 30°F / 0°C - SAE 5W30
Oil is a major factor affecting performance and service life. Use 4-stroke automotive detergent oil.
SAE 10W30 is recommended for general use. Other viscosities shown on the chart may be used when the average temperature in your area is within the recommended range.
The SAE oil viscosity and service classification are in the API label on the oil container. Honda recommends that you use API SERVICE category SF or SG oil.
I've been using a synthetic heavy duty 0W-30 engine oil in my Honda GX610 engine and have been using my engine hour meter to change the oil and filter every 60 hours.
Regarding oil filters, many people feel that Fram filters are below the quality of Wix or Purolator. I've had concerns with the drainback valve in the Wix filters being leaky and allowing oil to empty back into the crankcase. Lately, I've been using Fleetguard filters because Honda filters have been too expensive.
For more information about oil and filtration, visit Bob is the Oil Guy and the Engine Oil Filter Overview.